
Transforming ordinary footwear into a statement piece that reflects your individuality has never been more accessible. With a bit of patience, the right materials, and a dash of creativity, anyone can breathe new life into a humble pair of trainers or shoes. This guide will walk you through the entire process, from selecting your base shoes to sealing your finished design, ensuring that you create your own personalized shoes at home with confidence and flair.
Gathering your materials and choosing your base shoes
Essential Tools and Supplies for Shoe Customisation
Before you embark on your shoe customisation journey, it is crucial to assemble the necessary tools and supplies. High-quality materials make all the difference in achieving a professional finish. Angelus leather paint is widely regarded as the industry standard, offering a range of colours from standard hues to metallic, neon, glitter, and even glow-in-the-dark options. Fine detail brushes in sizes zero to four are indispensable for intricate work, while leather preparer and deglazer ensure that your paint adheres properly to the surface. A weather-resistant finisher or clear sealant will protect your design from the elements, and fabric markers are handy for sketching out your ideas before committing to paint. High-quality adhesives such as E6000 provide a strong bond for any embellishments you might want to add, and masking tape is essential for protecting areas you do not wish to paint. For those looking to venture beyond painting, tools like an eyelet puncher, scissors, a utility knife, pliers, needles, an awl, and a cutting mat will open up a world of possibilities.
Selecting the Right Pair of Trainers or Shoes to Transform
Choosing the right base shoe is a critical step in the customisation process. Canvas trainers are particularly popular among DIY enthusiasts because they offer a smooth surface that readily accepts paint, making them ideal for beginners. Leather shoes, on the other hand, provide a durable base that can withstand more rigorous treatment and last longer with proper care. When selecting your footwear, consider the intended purpose of your custom design. Will these shoes be worn daily, or are they destined to be a showpiece? Trainers, boots, and sandals all offer unique canvases for creativity. Canvas is forgiving and versatile, while leather demands a bit more preparation but rewards you with a longer-lasting finish. If you are planning to incorporate advanced techniques such as fabric replacement or sole swapping, ensure that the shoes you choose are structurally sound and worth the investment of time and materials.
Preparing Your Footwear for the Customisation Process
Cleaning and priming your shoes properly
Proper preparation is the foundation of any successful shoe customisation project. Begin by removing the laces and any detachable components to ensure you can work on every part of the shoe without obstruction. Clean the shoes thoroughly to remove dirt, oils, and any residues that might interfere with paint adhesion. A damp cloth with a gentle soap is usually sufficient, but avoid submerging your shoes in water or placing them in a washing machine, as this can damage the materials. Once clean, apply a leather deglazer or acetone to the areas you plan to paint. This step is essential because it removes any existing finishes or coatings that could prevent the paint from bonding properly. Lightly sand the surface with fine-grit sandpaper to create a slightly rough texture that helps the paint grip better. Use masking tape to cover any areas you do not wish to paint, such as soles, eyelets, or logos. Taking the time to prepare your shoes meticulously will pay dividends in the quality and longevity of your final design.
Sketching your design and planning your colour scheme
Before you pick up a brush, it is wise to sketch your design and plan your colour scheme. Fabric markers are excellent for drawing directly onto the shoe, allowing you to experiment with patterns and placements without committing to paint. Consider the overall aesthetic you wish to achieve. Minimalist designs with subtle colour blocking have become increasingly popular, as have abstract patterns and splatter effects. Nature-inspired motifs such as floral patterns and leaf designs offer a timeless appeal, while pop culture references and geometric patterns can make a bold statement. Seasonal themes also provide a wealth of inspiration. Spring designs might feature pastel colours and delicate florals, while summer calls for tropical themes and vibrant hues. Autumn invites earth tones and leaf motifs, and winter is the perfect time to explore galaxy prints and metallic accents. Sketching your design in advance helps you visualise the final product and identify any potential challenges before you begin painting.
Applying Paint and Creative Elements to Your Shoes
Techniques for Painting and Adding Patterns
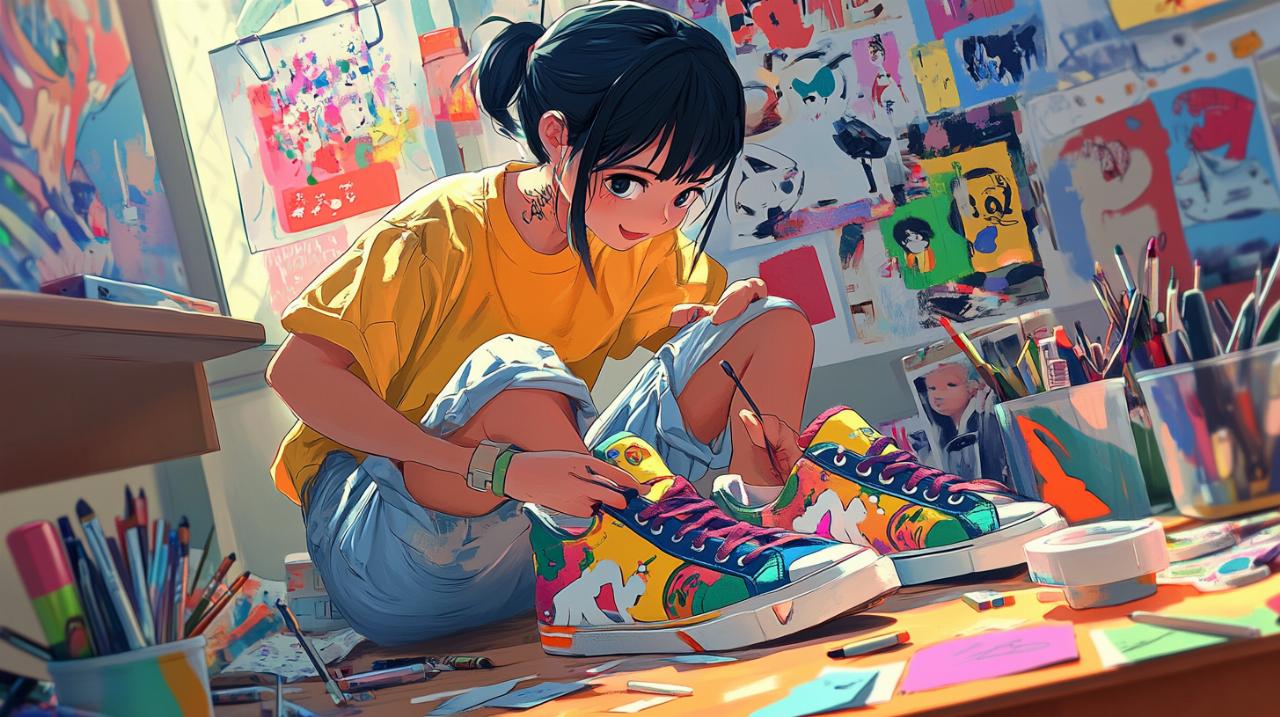
With your shoes prepped and your design planned, it is time to bring your vision to life. Hand painting is a popular technique that allows for unparalleled detail and uniqueness. Apply a base coat of paint and allow it to dry for fifteen to twenty minutes before adding subsequent layers. Depending on the opacity of your paint and the desired vibrancy of your design, you may need to apply anywhere from three to six layers. Patience is key; rushing the process can result in uneven coverage and a less polished finish. For those who prefer precision, stencils are invaluable for creating logos, text, or intricate patterns. Sublimation printing offers vibrant colours and is particularly effective on synthetic materials, while screen printing is a cost-effective option for those looking to produce multiple pairs with the same design. Laser engraving provides a sleek, precise finish, and digital printing is ideal for high-detail work that requires speed and accuracy. Heat transfer vinyl offers durable, textured finishes, and dip-dyeing creates artistic colour blends that are both eye-catching and unique. Colour blocking, where distinct sections of the shoe are painted in contrasting hues, remains a popular trend, as do abstract patterns that allow for free expression.
Incorporating embellishments and unique details
Once your base design is complete, consider adding embellishments to elevate your custom shoes to the next level. Studs, rhinestones, and patches can introduce texture and visual interest, transforming a simple painted design into a work of wearable art. High-quality adhesives such as E6000 ensure that these elements stay firmly in place, even with regular wear. Embroidery is another option that adds durability and a tactile dimension to your design. Custom laces, available in a variety of colours and patterns, provide an easy way to complement or contrast with your painted design. For those with access to more advanced tools, 3D printing can be used to create lightweight, innovative components such as custom soles or decorative elements that stand out. Patch application is particularly appealing because patches can be easily replaced or updated, allowing you to refresh your design without starting from scratch. Whether you choose to add bold accessories like metal studs or subtle details like embroidered initials, these finishing touches are what make your shoes truly your own.
Sealing and finishing your personalised footwear
Protecting your design with proper sealants
After investing time and effort into creating your custom design, protecting it with a proper sealant is essential. A weather-resistant finisher or clear sealant forms a protective barrier that shields your paint from moisture, scuffs, and fading caused by sunlight. Apply the sealant evenly over the entire painted surface, ensuring that every layer of paint is covered. Multiple thin coats are preferable to a single thick coat, as this reduces the risk of streaking or pooling. Allow each coat to dry completely before applying the next. If you live in an area with harsh weather conditions, consider using a sealant specifically formulated for outdoor use. This extra layer of protection will ensure that your design remains vibrant and intact, even when exposed to the elements. It is also wise to apply a protective spray periodically to maintain the finish, especially if you plan to wear your custom shoes frequently.
Final touches and curing your custom shoes
The final touches are what set a good custom shoe apart from a great one. Trim any excess material, clean up any paint that may have strayed beyond your intended lines, and polish any leather or synthetic surfaces to a shine. Once you are satisfied with your design, allow your shoes to cure fully. Curing times can vary depending on the materials and techniques used, but a general rule of thumb is to let your shoes rest for at least twenty-four to forty-eight hours before wearing them. This ensures that all paints, adhesives, and sealants have had adequate time to bond and harden. Store your shoes in a cool, dry place away from direct sunlight during the curing process. Ideally, keep them at a temperature between sixty and seventy degrees Fahrenheit with a humidity level of fifty to sixty percent. Using shoe trees during storage helps maintain the shape of your shoes and prevents creasing. Once cured, try on your shoes and make any necessary adjustments. If the fit is not quite right, consider adding or removing insole padding, or adjust the lacing to ensure comfort. Your custom shoes should not only look fantastic but also feel comfortable enough for regular wear.
Taking care of your custom shoes is just as important as creating them. Clean them gently with a soft brush and a damp cloth, avoiding harsh chemicals that could damage your design. Store them in individual shoe bags to prevent scuffing, and avoid stacking them to maintain their shape. Proper ventilation is crucial, so keep them in a space where air can circulate freely. Touch up any minor chips or scuffs as needed to keep your design looking fresh. With the right care and attention, your personalised footwear can remain a cherished part of your wardrobe for years to come, a testament to your creativity and unique sense of style.